 Not only will this allow you to switch between different keyboard types, this also will put another icon on the already tight Menu bar.
 ![]()
Finally had to fix the Dell Mini 9 keyboard. If you’ve played with one of these netbooks or have one, you’ll know that the quote/apostrophe key is located in the wrong spot when compared to normal US keyboards. The key is located to the bottom row of keys and takes some getting use to.
Well I thought I could get use to it. It started to become one of those minor irritants that you can’t seem to correct. Sort of like an itch you can’t scratch. The other night I had enough of that itch.
I went to the end-all-be-all destination of Dell Mini 9 knowledge and started hunting around for some solutions. There are basically two solutions: Get a replacement keyboard from Dell or remap the keyboard to meet your needs.
Some savvy Dell Mini 9 owner was able to get their hands on a US International keyboard from Dell over the phone. The keyboard is laid out “correctly” although the keys are smaller. The interesting part of this solution was the cost of the keyboard went from a reasonable $19 to over $40. “Supply and demand” is the line that Dell is standing by for the price increase. It sad to think that the keyboard of a netbook computer is 20% of the cost of the netbook.
Since the price was pretty stiff, I decided to try my hand at the keyboard remapping technique. This thread contained all the necessary information to make it happen.
In short, got my hands on the free Ukelele application and created a new keyboard layout. Here are a couple of notes if you attempt  this:
this:
First, do read the directions – or at least the readme file. It contains some pretty important steps on where and how to install your new keyboard layout.
This process has you create a new keyboard layout – However, you cannot just remap the keys that you want and skip all the other normal keys. When you create a new keyboard layout, you need to map every key — even the space bar. Also, don’t forget the uppercase characters and symbols. This sounds like a lot of work, but it really isn’t — maybe 5 minutes of work. It’s worth it.
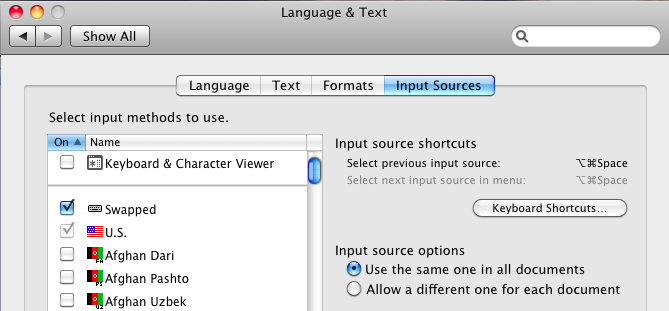
Once you have the new keyboard layout, you basically will be turning on international keyboard support and turning on multiple input sources. In the picture below, you’ll see I named my Swapped.

Not only will this allow you to switch between different keyboard types, this also will put another icon on the already tight Menu bar. There is a option at the bottom of the preferences screen that will remove the icon once you’ve switched it over to the new keyboard. (Note the Input source keyboard shortcuts.)
![]()
Lastly, I physically changed the keys on the keyboard. Be careful here as if you’re too rough, you may actually break the keycaps. They should just pop off and snap back on. So the only thing that is out of place on the keyboard is the F10 key. I don’t normally use that key, so no big deal.
I’ve been using the new, improved layout for a few days now and it’s absolutely worth the 10 minutes of work to setup.
-JT